There’s closets in my head where dirty things are kept
That never see the light of day.
I want to drag them out, go for a walk
Just to see the look that’s on your face.
- Neil Finn / Crowded House Love You ‘Til the Day I Die

Bald Eagle (Haliaeetus leucocephalus) - Huntington State Park, Murrells Inlet, SC
Bless me, Father, for I have sinned. It has been five months since my last confession blog post.
We left New Zealand in September 2017 with a plan to return home to Myrtle Beach, put our house up for sale, and move back to NZ permanently by April or May of 2018. There were a lot of steps that needed to be accomplished to bring that plan to fruition. Getting our immigration sorted was going to be the most time consuming and cumbersome. We needed to get my permanent NZ medical license approved to then put in an immigration screening application. Once the screening application was approved, we would have 4 months to complete the full application. When our immigration is approved (still waiting), we can put the house up for sale. To get the house ready to be sold, we would have contractors in and out of our house for about 4 months; but before we could do that, we needed to replenish the savings we plowed through during our year away. Simple, right? Yeah, right. Neither simple nor easy. Every one of those pieces was a project in and of itself.
We actually started the process before leaving New Zealand by getting my Medical Council application started. I thought we had all the pieces in place before we left, but for the next 2 months there seemed to be an endless stream of requests for clarification and reams of paperwork. During our year in NZ, I complained constantly about the enormous percentage of my paycheck the staffing company took as their fee. I would almost be willing to pay it again just to have someone else deal with this bureaucratic nightmare. We were told it could take up to 6 months for my Medical Council approval to come through, but on Dec 3rd I received a letter informing me of my acceptance to a provisional vocational scope of practice with the Medical Council of New Zealand. Things were finally starting to happen.
I immediately started to work on our immigration application, and in the mean time we had put enough money away to start having our contractor come by. When we bought our house, we did so as a one day auction on a short sale. No inspection, just a walk through and a decision. We had been looking at several houses, and there was a smaller one that I actually preferred, but we loved the entranceway and light streaming into the great room, and this one was Kari’s favorite. In the end, we placed a bid for $1000 over asking price and that night we were informed that we had won. Unfortunately, the house came with a lot of things that needed work ... some minor and some anything but. We were lucky to find a contractor who has been with us every step of the way over the past several years.
 Our home just before we bought it in 2011
We actually started the process before leaving New Zealand by getting my Medical Council application started. I thought we had all the pieces in place before we left, but for the next 2 months there seemed to be an endless stream of requests for clarification and reams of paperwork. During our year in NZ, I complained constantly about the enormous percentage of my paycheck the staffing company took as their fee. I would almost be willing to pay it again just to have someone else deal with this bureaucratic nightmare. We were told it could take up to 6 months for my Medical Council approval to come through, but on Dec 3rd I received a letter informing me of my acceptance to a provisional vocational scope of practice with the Medical Council of New Zealand. Things were finally starting to happen.
I immediately started to work on our immigration application, and in the mean time we had put enough money away to start having our contractor come by. When we bought our house, we did so as a one day auction on a short sale. No inspection, just a walk through and a decision. We had been looking at several houses, and there was a smaller one that I actually preferred, but we loved the entranceway and light streaming into the great room, and this one was Kari’s favorite. In the end, we placed a bid for $1000 over asking price and that night we were informed that we had won. Unfortunately, the house came with a lot of things that needed work ... some minor and some anything but. We were lucky to find a contractor who has been with us every step of the way over the past several years.
And you may find yourself living in a shotgun shack
And you may find yourself in another part of the world
And you may find yourself behind the wheel of a large automobile
And you may find yourself in a beautiful house
With a beautiful wife
And you may ask yourself, “Well, how did I get here?”
- Talking Heads Once in a Lifetime
As you might already suspect, nothing we do is simple, easy, or straightforward. While we bid on the house in March 2011, took possession in May, and moved in June, we didn’t actually own it until January of the following year. That’s right, we were squatters in our own home for about 8 months. The short version is that the former owner had been foreclosed on so couldn’t stay in the home. When we showed up, it had been empty for the better part of a year. We needed a place to stay, and we had a key, so we moved in even though we didn’t own it. We had a contract but couldn’t close the sale because of some legal problems with the previous owner. While we had to keep up with paying the utilities while we were living there, we didn’t have a mortgage (yet) and we weren’t paying rent. We did little things to fix stuff, but I wasn’t going to invest any money in the house until I had the title. The worst part was that our air conditioning / heating died in August. I’ll be damned if I was going to spend $8K to replace it when I didn’t own the house, so we sweltered through an Indian summer and used extra blankets through the winter. When we finally closed on the house in January 2012, nearly a year after we “bought” it, we started fixing things in earnest.
Those of you who know us well are probably aware of our clothes problem; we own more clothes than any two people should really have. It’s so bad that Kari will occasionally find clothes in the closet that she forgot she bought years ago, still with the tags on and never worn! When you have all that stuff, you need somewhere to put it. Even with a large walk in closet and two chests of drawers, Kari still had a “walk-on” closet (the floor on her side of the bed on which she stacked clothes). When we moved into the house, the closets had those white wire closet storage racks/hangers. From the sheer weight of her clothes, the anchors would occasionally fail and the whole unit would rip out of the wall, dumping her clothes on the floor. I finally got tired of constantly repairing the racks, so decided to do something about it. My plan was to build permanent shelves and cabinets.

Walk-in closet, partially completed.
The first step was to get shelves and a clothes bar installed (Left-hand side in the photo above). That bought me time and space to get the much bigger projects going. Kari has quite the collection of cowboy boots and calf/knee-high boots and I wanted to get them up off the floor, so the back wall was built with boot racks up high. Room for 16 pairs of shoes was then added. A chest of drawers completed Kari’s portion of the closet. The old wire rack system was initially left in place on my side. The shelves and racks on the left went up in a week or two. I have a full-time job, and it’s not as a professional carpenter or cabinet maker, so the boot/shoe racks and drawers took another several months.
Life then got in the way and very little progress was made on the closet. At one point, our garage was so full of things we had brought up from Texas that I couldn’t get to my shop tools for almost 18 months. Once I could get to my tools, other household projects always seemed to take precedence. Then we left for a year. All told, the closet project stalled out for almost 4 years. I would make half-assed efforts to get some work done, but if I told Kari I was going to spend the week-end in the garage working on the closet, what I really meant was “I’m going to spend the week-end playing with my power tools and spending money on oak panels, but don’t expect me to actually accomplish very much.” With our return to the U.S., and our plan to put our house up for sale, the closet needed to either be torn out or completed. I set my sights on a surge of completion.

Three rooms piled into one.


Scaffolding and spackle.
Renovating a house while you are still living in it is a bit of a logistical nightmare. Our plan was to do one or two rooms at a time, moving everything out of those rooms and piling it into a couple of others. By constantly shuffling things between rooms, and starting on the second floor, we had hoped to minimize the disruption in our lives. Oh, the best laid plans. Regardless of whether the contractors were working in the spaces in which we were living or not, having them tromping through our lives every day was every bit as disruptive as we were hoping to avoid. Add in that I work nights and sleep during the day, and my “down time” was anything but restful.
Prior to us moving in, the house had been empty for almost a year. South Carolina’s Low Country in the summer is humid place and the sheetrock, dry-wall, etc absorbed all that moisture. After running the air conditioner constantly for several months, things started drying out and the cracks appeared. Many of the dry-wall seams and almost all of the ceiling seams started to show buckling and cracks. Our house was put up during the housing boom and the ceiling sheet-rock was put up with nails (faster) rather than screws (better but more time consuming). As the underlying wood dried out and contracted, the nails started to back out. The entire ceiling was sagging in places. Cosmetic stuff. Everything was structurally sound and there were no leaks, so we did nothing about it. We just don’t care much about aesthetics. Well, you can’t sell a half-million dollar house in a gated golf-club community as a “fixer-upper” so suddenly we had to care. I initially tried doing the work myself, but the outcome was less than professional, it took me days to do just a small section, and I made a terrible mess in the process. We sucked it up and brought in the professionals.


Master bedrooms ... upstairs and down.

Garage Shop is open for business.
Leaving it to the professionals turned out to be the best idea in terms of time, efficiency, cleanliness, and outcome. And it allowed me to take on a couple of projects of my own. The first step was getting the garage cleaned out, re-organized, and setting up my wood shop again. I was going to be spending a whole lot of time in there over the next several months, so I made sure the garage refrigerator was stocked, tuned the radio to my favorite station, and dusted off the heater ... that garage is damned cold on winter mornings and late at night.
I wanted to get started on the closet, but first we needed to empty it out and have somewhere to put everything, and that meant the upstairs master bedroom had to be finished. So, I set my sights on a more immediate and manageable task. When Kari and I moved to Washington DC after med school (2006), we had a bunch of mis-matched furniture from our previous living arrangements. We had no outdoor furniture, so we bought a teak outdoor table and chair set. We had nearly nothing to our names, but we had a sweet outdoor dining area! That table and chair set hosted countless crawfish boils and survived 2 years in DC and 3 years in Iowa City, including 3 Iowa winters. We dragged it with us to South Carolina where it baked in the sun. It hadn’t seen the rough side of a piece of sandpaper or a drop of oil for 12 hard-worn years and it looked every bit as damaged as you imagine it would. I was all for scrapping it and buying new. Kari pointed out that we didn’t have the money to buy new and that we needed it to not look completely trashed when it came time to show the house.
My plan was to disassemble the table and chairs down to individual slats. I (mostly) succeeded and ended up with a pile of wood fit only for the fire pit. I set to work with sander and teak oil bringing those tired scraps back to life. The pieces would never look new again, but the battle scars, crawfish stains, and sun-cracks gave history to the pieces, and they are better for it. As much as I hate to admit it, Kari was right. The table and chairs look great and I am happy to pack them for the trip across the pond when we finally leave. Ten years from now, though, I’m buying new.


My wood looks great after rubbing some oil on it.
Finally, the upstairs master bedroom re-do was complete. New floor laid, seams taped and mudded, and fresh paint slapped everywhere. We moved ourselves upstairs so the contractors could start working downstairs. While they were doing that, I got into the downstairs master suite walk-in closet and demo’d the wire rack system. I was glad to finally be shut of it all. The damage to the underlying dry-wall was extensive, so everything had to be repaired, sanded, and painted before I could start building the shelving, cabinets, and drawers for my side.

Closet demo’d. You can see the original work I did for Kari’s side. The ceiling is 10’ high, so the high shelves are at 8’. The tall sections at the back are for boots. There’s room for 16 pairs of shoes, and the drawers are deep.

3/4” Oak boards are expensive ... about $9/ft for the 12” x 3/4” boards that make up most of the closet ... so, the backs for some of the drawers are made from glued-up scraps. A channel is routered into each board for the drawer bottom.

The backs of the drawers are planed down to 1/2” and installed using a rabbett joint.

Dove-tail joints connect the front and sides for each drawer.

Eschewing modern hardware, each drawer rides on a hard-wood rail, lovingly lubricated by rubbing in bee’s wax wood conditioner.
Et, voila!

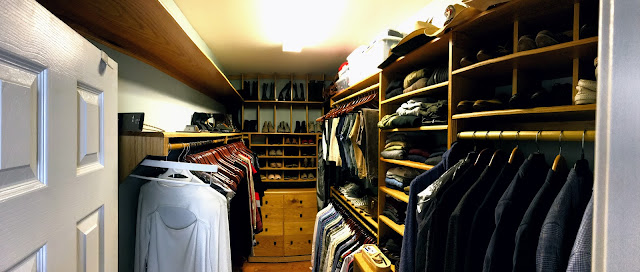
Finished product. Kari has a high rack on the left for dresses and such, room for 14 pairs of boots and 16 pairs of shoes, and a chest of 8 drawers, the bottom two of which are extra deep. I have two shorter racks (one up, one down), a cabinet of shelves, a chest of drawers, and a small tall rack for sport coats and such. I also have a shoe rack (6 slots) and a boot rack (7 slots).
Working on the project only sporadically, it took almost 5 years to complete. I spent untold hours in the garage and the materials cost is something I don’t even want to think about. Each piece was measured 5 or 6 times before cutting (measure twice, cut once doesn’t work out so well in my shop). Even with that care and meticulousness, I made endless mistakes. After measuring, cutting, and sanding, the pieces were clear-coated. Sanding was in 4 parts ... 80 grit, 120 grit, 180 grit, and 220 grit. Each piece has four layers of clear coat, sanded between coats with 400 grit and 600 grit. The last coat is wet-sanded with 1000 grit paper for a smooth, glassy finish. Every time I needed to learn a new technique, particularly with joinery, I would take on a mini project for something else so I could work out the steps and the kinks before committing it to oak.
I learned a lot of specific wood-working techniques along the way, but I learned a lot of lessons, too. The first was patience. Rushing any step inevitably led to destruction, frustration, and an expensive do-over. I also learned how to fix minor mistakes, hide them, or incorporate them as a “feature”. I am my own worst critic. I look at this project and I am proud, but I also see all the tiny little things that went wrong (and there are many).
I am both sad and excited to see it finally completed. I will definitely take on something like this again, but I think I will do it with cheaper wood ...


Shop pics that I really liked but couldn’t figure out how to incorporate into the story.

Our house is a very, very, very fine house ...
In Kari’s defense, I do not think that is a lot of boot/shoe storage. Frankly, Highstead, you should probably spend next weekend building her ancillary shoe storage.
ReplyDeleteIn Kari’s defense, I don’t think that’s a lot of shoe/boot storage. Frankly, Highstead, you should probably spend next weekend building her ancillary shoe storage.
ReplyDeleteGreat job Grant! You've always taken pride in your projects. Love the fire pit too! Hope to see it before you guys leave.
ReplyDelete